Related Posts Plugin for WordPress, Blogger...
Showing posts with label DIY. Show all posts

Tuesday, June 2, 2015

How to Make a Floral Garland

We came across this lovely DIY garland tutorial on Free ThePeople and thought it was just too good not to share. 

It’s also a great way of bringing in one of the hottest wedding trends (Number 5 Foliage Runners from Top Wedding Trends for 2015/2016) into your wedding without breaking the budget... and it looks amazing!

 This garland runner is re-purposed as a table runner, backdrop and chair draping! We love this idea. 

Use as chair decoration

Use as backdrop for photos

Use as a foliage runner

Use as a swing chair decoration
For more on the details on how to make the garland, click here.

Tuesday, September 18, 2012

Pretty Simple: a DIY lace braid

I'm all for minimal effort, maximum impact, and this little DIY tutorial on how to do a cute lace braid is the perfect example of just that. Found on bridalmusings.com (one of our favourite wedding sites), this tutorial requires about a metre long piece of pretty lace and a hairband. All you need to do is create a criss cross effect with the lace all the way down your hair ponytail and VOILA! Pretty and simple don't you think?


For more tips on how to jazz up this hairdo, visit the blog post on bridalmusings.com.

Photo credit: simplyjessie.com

Monday, July 9, 2012

Vintage & DIY Prettiness at Oakfield Farm

One of Johannesburg’s loveliest wedding venues, Oakfield Farm, was the setting for this distinctly DIY vintage wedding. Amy and Jeff tied the knot in February and their reception was held at Oakfield’s Summer House venue, which is a lovely, airy venue, with loads of natural light making it perfect for the vintage theme.

Amy, Jeff, her mom and a friend helped make the 300 m (!) of bunting which adorned the high beam ceilings. Baby’s breath, vintage books and trophies adorned the tables. And as a vintage wedding isn’t complete without some nostalgic pieces from grandparents, Amy made a point of incorporating her Grandpa Jan's vintage cameras into her decor.

Personally, we’re loving the black balloons, Amy’s dress and handmade lace rosette (from Little White Dress on Etsy), the baby's breath bouquet and the red vintage car... The talented Black Frame Photography is to thank for the beautiful pics and the vintage decor was hired from Moi Decor. Enjoy! xx


Photo credits: {Black Frame Photography}

Thursday, July 5, 2012

DIY: Coffee Filter Roses

We thought it time for another DIY and we came across these lovely paper roses – made from coffee filters. They come out looking gorgeous and you can use them for a myriad of things on your wedding day: as favours, boutonnieres, cake decorations, for centrepieces or even for your bouquet!

Photo credit: {emmalee-design.com}
What’s so great about these roses is that they all come out looking a bit different and you can really choose how you want to dye them – with red wine, beetroot juice or just some water colours. The coffee paper filter really absorbs the colours very well.
We found this tutorial on emmalee-design.com, so click here for a detailed step by step tutorial! After that, let your imagination take the lead in deciding where and how to use them!

Photo credit: {bridalmusings.com}

Wednesday, June 20, 2012

DIY: Cupcake Wrappers Made from Doilies

A major trend which can be seen is that of cup cake wrappers. Some can be quite pricey, but give a very polished look to a cupcake – and let’s face it: when it comes to weddings, cupcakes are all the rage! We found this very cute DIY project which transforms ordinary doilies into cupcake wrappers on intimiteweddings.com. It’s simple and easy to do.


You will need:

large paper doilies
pencil
scissors
Pritt
cupcake wrapper template (available here)

Place doilie on a flat surface.
Cut out cupcake wrappers from the template. Place the cut out wrappers on the doilie.
Trace along the inside curve and at the ends. Do not trace the outside curve. Cut out the cupcake wrapper.
Using the Pritt, add glue to one of the edges of the wrapper. Wrap around cupcake and adhere. Voila!

Photo & tutorial credit: {intimiteweddings.com}

Monday, June 11, 2012

Confetti Ideas

There are so many different confetti options nowadays – gone are the days when all you were subjected to was rice or typical "punched out paper" confetti circles. This is one way you can showcase your DIY skills or your personality as a couple and have some fun with it!

Cute confetti idea include:
Bubbles
Mini paper planes
Lavender bits
Potpourri (either in a vintage suitcase or tucked in pretty paper cones)
Ribbon wands
Punched out paper from old books or even Dulux colour swatches (you can do stars, hearts, circles or whatever tickles your fancy – choose your punch at an Arts and Crafts stores such as Herbert Evans Craft Store in Rosebank or Fourways or Craft Routes in Woodlands Mall, Pretoria)

Photo credits – clockwise from top:
{thebridesguide.marthastewartweddings.com}{moi-decor.blogspot.com}{www.stylemepretty.com}{welovepictures.blogspot.com}{tie-the-bow.blogspot.com}{flyawaybride.com}{greenweddingshoes.com}{www.rockmywedding.co.uk}

Thursday, March 22, 2012

DIY project: Tulips wrapped in burlap (hessian)

Sorry for the late post this week. It’s been quite busy and the public holiday just added to the business. We do hope you had a lovely Human Rights Day though!

We love simple DIY projects, and this one is one of them and is so pretty. It makes a perfect little thank you gift or bridesmaid bouquet. All you need are some tulips (6 or so) a square piece of hessian and some pretty ribbon and voila! You have a perfect bouquet. Get the free printable and full DIY tutorial here.


Photo credit: {jennysteffens.blogspot.com}

Tuesday, January 31, 2012

DIY Heart Mobile

Goodbye January! Hello month of LUURVE! It’s February already (can you believe it) and we want to kick it off with some LOVEly heart DIY. This pretty crayon heart mobile is simple to make and oh so pretty. I found the tutorial on marthastewart.com, so click here to see how to make it.


Photo credit: marthastewart.com

Tuesday, November 29, 2011

Tuesday Shoesday: DIY Glitter Heels

We were so inspired by yesterdays post and in such a "glitter-me" mood that we decided to showcase a great DIY project for the honeys who want glitter shoes. You know, if finding your perfect glitter heels proves difficult! Read the full DIY process here.


Photo credits: {teresadoesit.com}

Thursday, November 17, 2011

DIY Lace votives

This is such an awesome DIY from Family Chic! Spruce up some plain ol' votives with pretty lace ribbon, which you can get at a haberdashery or even a craft store in your area. Just cut off a strip of the lace that covers the perimeter of your votive candle and sew the overlapped edges together so it stays in place. And Voila! Cute little votives...

IMG_5418-1024x680


IMG_5401-680x1024


Photo credits: {family chic}

Monday, November 14, 2011

Inspirational DIY wedding at Kleinkaap, Centurion

Happy Monday friends! So sorry for being quiet, but I was in Cape Town last week for a bit of R & R...although I spent more time perusing vintage stores and cafes along the City Bowl and Southern Suburbs more than anything else...

Nevertheless, I happen to have a treat for you today. The lovely Gauteng based Laura from LauraJane Photography recently posted such a stunning DIY wedding held at Kleinkaap in Centurion and I just had to share it with you. The bride’s vision is so inspiring! She made all the stationery, the bunting, table decorations and boutonnieres. We are particularly loving her seating chart (rosette badges on ribbons which guests could pin to their outfits so everyone knew who was who ...so clever!) and the word search puzzle guests could play with while they wait. We love it all!

So many treats to feast the eye with this post... View the rest here. Enjoy xx

6-Pieter-Megan(pp_w860_h626)


4-Pieter-Megan(pp_w860_h626)


7-Pieter-Megan(pp_w860_h626)


3-Pieter-Megan(pp_w860_h626)


14-Pieter-Megan(pp_w860_h626)


18-Pieter-Megan(pp_w860_h573)


20-Pieter-Megan(pp_w860_h626)


28-Pieter-Megan(pp_w860_h397)


30-Pieter-Megan(pp_w860_h573)


Photo credits: {laurajanephotography.co.za}

Thursday, October 20, 2011

DIY Inspiration: Mini Cookie Wedding Cakes

I love this idea! It’s not only super cute and will get the guests talking, but it’s a great DIY project too. These mini wedding cake cookie things actually come from Martha Stewart Weddings, although I found this DIY tutorial on Lucy Dylan Weddings. You can find royal icing at any baking shop or try www.cakedeco.co.za.


Sugar Cookie Cakes (from Martha Stewart Weddings, Winter 2006)
Makes 64 cookies, enough for 8 cakes
• 8 cups sifted all purpose flour
• 2 tsp baking powder
• 1 tsp salt
• 2 cups unsalted butter, softened
• 4 cups sugar
• 4 eggs
• 4 tsp vanilla extract
• Small store-bought gum-paste or icing flowers (2 cm each)

Sift flour, baking powder, and salt into a large bowl; set aside.
Put butter and sugar into the bowl of an electric mixer fitted with the paddle attachment.
Mix on medium speed until pale and fluffy. Mix in eggs and vanilla. Reduce speed to low.
Gradually mix in flour mixture. Divide dough into 4 pieces; flatten each into a disk, and wrap in plastic.
Refrigerate until firm, at least 1 hour (or overnight).

Preheat oven to 180 degrees with racks in upper and lower thirds. Let 1 disk of dough stand at room temperature just until soft enough to roll, about 10 minutes. Roll out dough on a lightly floured work surface to 0.6c cm thick, adding more flour as needed to keep dough from sticking. Using cookie cutters, cut out 24 x 8cm rounds, 24 x 7cm rounds, and 16 x 5cm rounds. Transfer to baking sheets lined with parchment paper as you work, keeping rounds of the same size on the same sheet. Repeat with remaining dough.

Chill in freezer until very firm, about 15 minutes. Bake until edges turn golden, 15 to 18 minutes. Transfer cookies to racks; let cool completely. Transfer icing to a pastry bag fitted with a small plain round tip. Pipe around top edges of each cookie, about half a centimeter from edge; fill in with a thin layer of icing. Smooth with a small offset spatula. (Reserve about 1/4 cup icing for assembling cookie cakes.) Let set, at least 6 hours (or overnight).

Stack 3 large cookies, securing with dabs of icing in between. Repeat, stacking 3 medium cookies and 2 small cookies on top. Secure a gum-paste flower on top of each cookie cake using a small amount of icing. Repeat with remaining cookies and icing. Let stand until set, at least 30 minutes, before packaging.

Happy baking!

Photo credits: {lavidacreations.com}

Thursday, October 6, 2011

DIY Tutorial: Chiffon / Tulle Flowers

A few weeks back I posted beautiful blue shoes, adorned with cute little chiffon flowers (which were clipped on) for Tuesday Shoesday. Here is a DIY tutorial I found on one of my favourite blogs, Sparkle and Hay, on how to make these precious little treasures yourself...and you can use them on hair, pinned on a dress, shoes or a clutch. They are so easy to make and are super versatile and will add that little element of girly-ness to your look!

This is what you will need:
Chiffon and tulle fabric – how many metres will depend on how many flowers you want.
Paper, a pen, scissors, pins, needle & thread, and glass seed beads.


Step 1:
Create a stencil by drawing a single petal shape on the paper and cut it out. You can Google petal patterns to help you here.


Step 2:
Take your fabric and fold it into a square a little larger than the flower pattern. Pin the pattern to fabric and carefully cut out. Repeat this process until you have enough layers to make a full flower – the number of layers will vary depending on the weight of your fabrics and the size of your flower. (Example shown here uses 26 layers of fabric)


Step 3:
Stack flower cut outs, alternating fabric types and staggering petals. Use a needle and thread to secure them together at the center. Pinch together the center of the flower (from the bottom) and secure with stitches to create volume and give the flower and authentic shape.


Step 4:
If desired, sew decorative seed beads in the inside center of the flower and sew the flower to a hair clip, comb, or piece of ribbon.

Photo credit: {sparkleandhay.com}

Thursday, September 15, 2011

DIY Idea: Aisle Runner

It’s DIY Thursday and we found the most unique DIY project that is so sentimental it’s sure to make a lasting impression on your groom and your guests. This DIY aisle runner, made up of black fabric written on with white fabric paint, contains a message from the bride to the groom and is a quaint way of expressing your feelings on your big day without getting all choked up about it! We found this idea on the blog of Cape based photographer Lizelle Lotter. You can write a bible verse, a poem or any kind of message you wish to share with your groom and guests. Even though this is a Cape wedding, the details are so inspiring that I urge you to just grab a cup of coffee and take it all in... enjoy! View the whole post here.


Photo credits: {lizellelotter.co.za}

Thursday, August 18, 2011

DIY Idea: Ribbon Wands

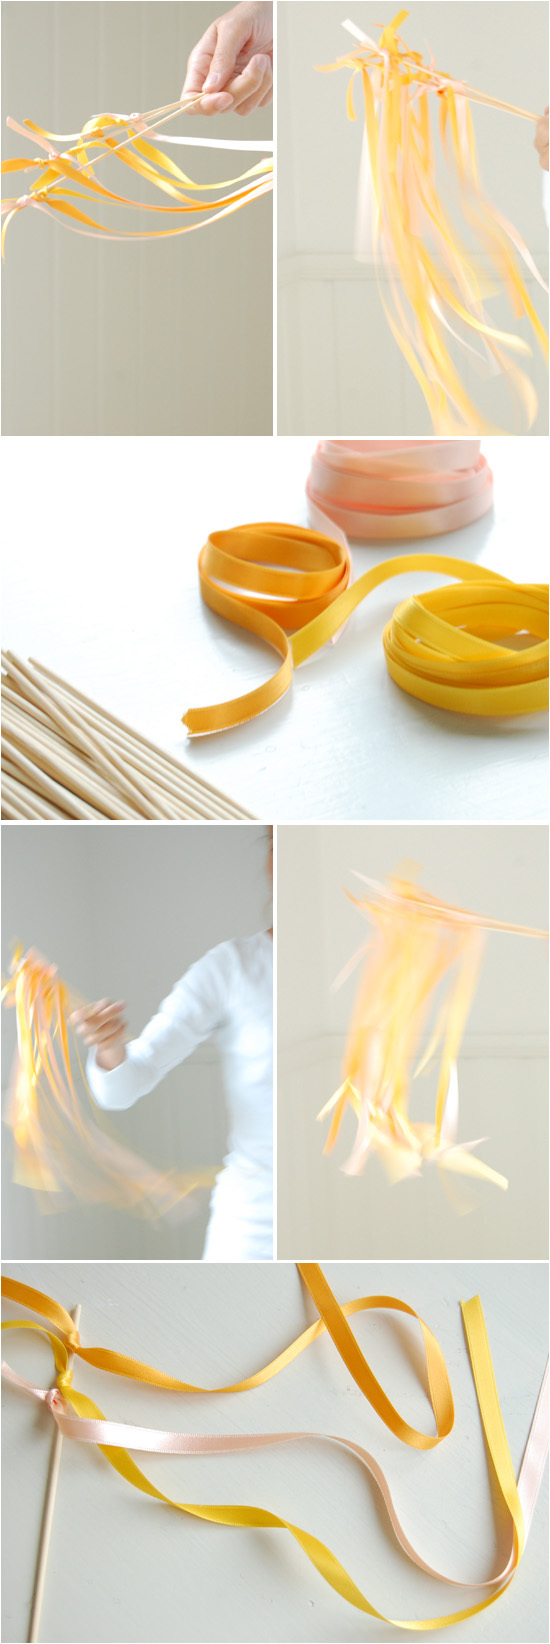
It’s DIY Thursday! And we have the perfect alternative to the boring old confetti and rice for when you and your groom walk out the church as man and wife: ribbon wands! They are easy to make, can be used later in the evening when you leave the ceremony and make a cute memento...


What you will need:

  • Long wooden skewers – the ones that you use to make sosaties are fine (from any supermarket or grocery store). Preferably the ones without the sharp pointed edges...you don’t want the flowergirls poking their eyes out!

  • Approx 30cm - 60cm ribbon in your wedding colors. You can decide on the length here, but make sure all the ribbons you use have the same length. You can opt for one ribbon colour or a few in your wedding colours, thick or thin. Moi Decor has the most stunning collection of fabric ribbons in the most beautiful colours. In this example they have used thin satin ribbon in three colours. More ribbon makes more impact!


Instructions

Simply cut the ribbon in your desired length. If the ribbon is thin you can get away with tying it tightly on the skewer. If they are slightly thicker you may need some Bostik to glue the ribbon to the skewer. See what works best and test it before your big day!


This DIY project was created by Project Wedding
Photo credits: {www.projectwedding.com}

Thursday, July 28, 2011

DIY Ring Pillow

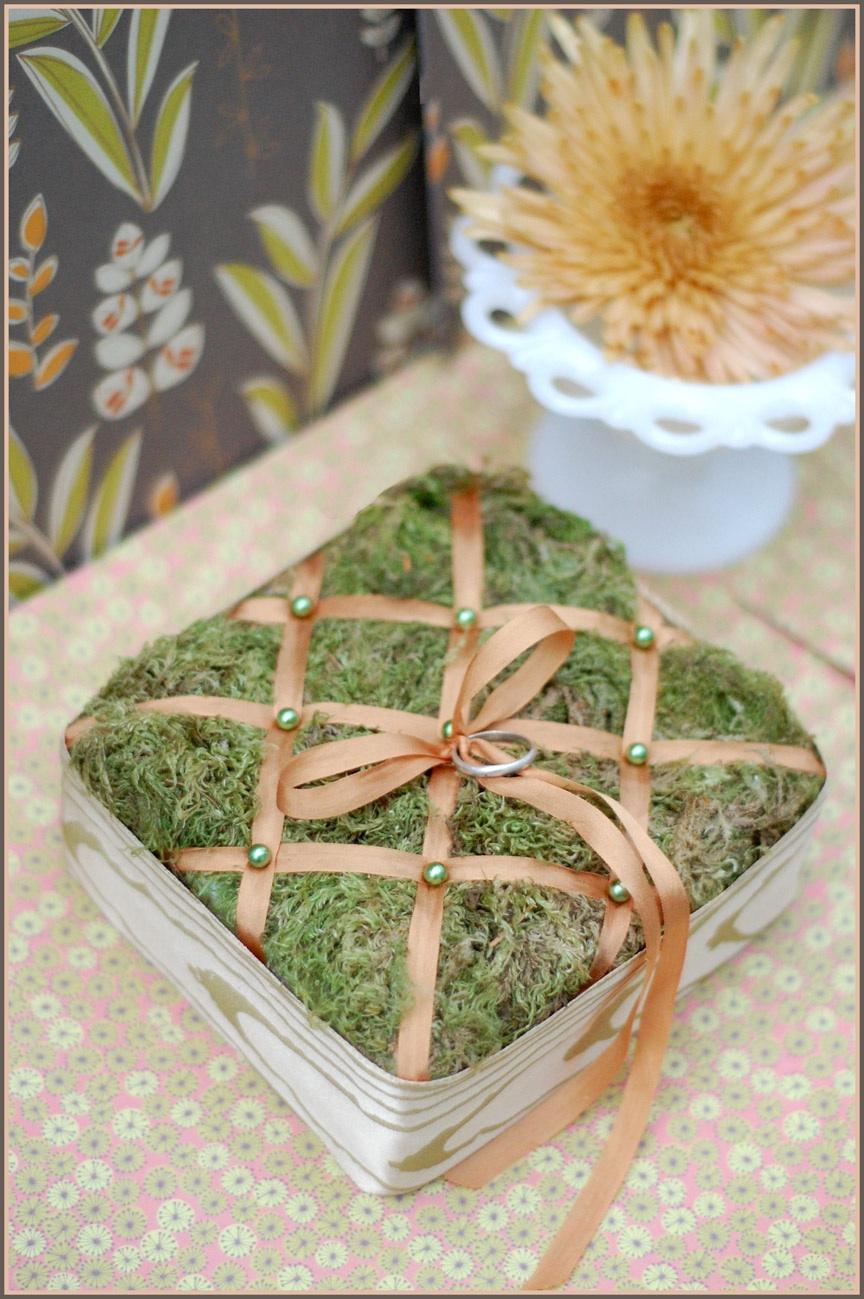
It’s DIY Thursday at Teapots and I came across the cutest idea for your ring pillow –especially if you are having a rustic inspired wedding. Wedding pillows are so costly these days (I have never really understood why) and this one is so adorable and easy to make.


What you'll need:
  • A 13cm x 13cm X 3cm piece of Styrofoam

  • 70cm fabric ribbon (3cm wide)

  • 3 metres fabric ribbon (less than 1cm wide)

  • A 15cm x 15cm scrap of fabric

  • A handful of sphagnum moss

  • Straight pins

  • Round-headed pins

  • A pair of scissors


You can get the ribbons from Moi Decor, and the rest of the items from Flowerspot. You may need to find your pins from a haberdashery shop though.


Instructions
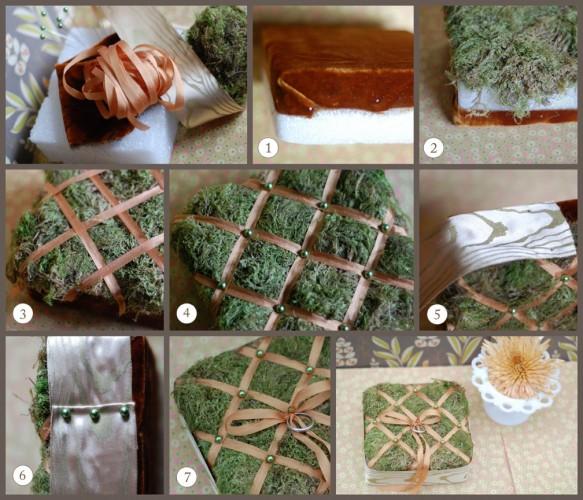
1. Centre your fabric face up on the Styrofoam square and fold the scrap fabric
edges over sides of the Styrofoam and secure with straight pins. Wrap
the corners neatly and pin. (see figure 1)
2. Turn your Styrofoam over so the fabric side is down. Take your
sphagnum moss and stretch it out across the top of the Styrofoam. Be sure
that the moss completely covers the surface. (see figure 2)
3. Cut a length of the skinnier ribbon and run it diagonally across the
mossed surface. Attach both ends of the ribbons on the sides of the
Styrofoam using straight pins. Repeat this process to create a diagonal
grid of ribbon on the top of the pillow.
4. Take your round-headed pins and stick them into the points where the
ribbons intersect on the pillow top. (see figure 4)
5. Turn the pillow on its side and pin the end of the wider ribbon in
the centre of the side, using your straight pins. (see figure 5)
6. Wrap the ribbon around all four sides, concealing the fabric edges and
skinny ribbon tails. Pull it tightly as you go and keep the ribbon edges
lined up with the edges of the pillow. (see figure 5)
7. When you pass your starting point, fold under the ribbon tail and pin
it down using your round-headed pins. (see figure 6)
8. Trim off any loose moss bits.
9. Cut a 30cm piece of the skinnier ribbon and tie it to the round-headed pin
in the centre of the pillow. Attach your rings by tying a bow. (see
figure 7)

This DIY project was created by Laurie Cinotto
Photo credits: {www.lalalaurie.com}

Thursday, July 14, 2011

DIY Idea: Brooch Bouquet


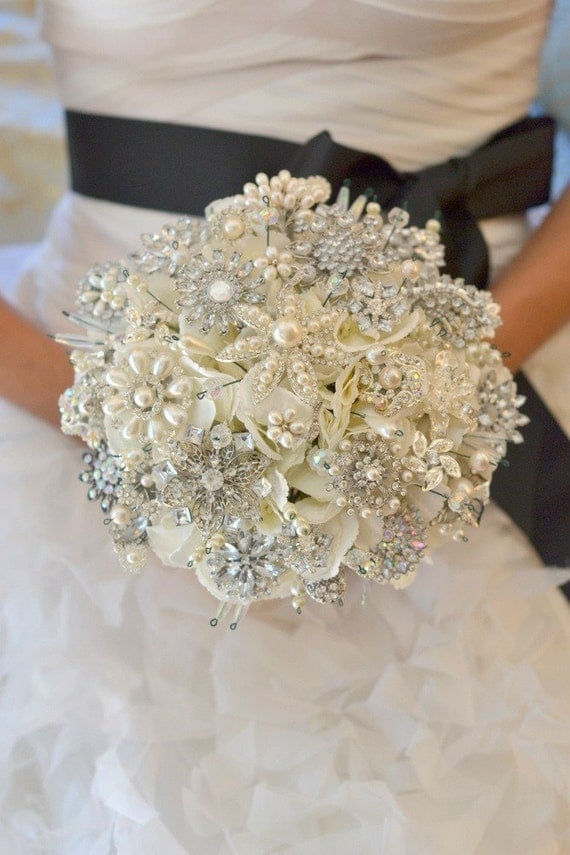
One of the most recent wedding trends I love is the idea of a brooch bouquet – its quirky, tasteful and allows you to incorporate a myriad of sentimental pieces into your wedding day. And the best is that this is a perfect DIY project that doesn’t shout “I’m a DIY project” on what many people may consider your most important day. By making the bouquet yourself, you can decide on the colour scheme and what baubles(earrings, hatpins) and brooches to add. And it will make a wonderful keepsake for years to come. I found an awesome tutorial on how to make your own bouquet because I couldn’t really find a supplier in Gauteng that does this – and I think it’s better because its more personal if you make your own. Visit fancypantsweddings.com to view the tutorial.

Photo credit: {etsy.com}